| distractions
There are several projects I've been working on that have been stalled and are now moving forward, mostly.
Pinhole Photography
My pinholes arrived Thursday. I paid good money for nothing. The set of 12 pinholes (for different focal lengths) fortunately were surrounded by a 1.5 inch square piece of .001" thick piece of stainless steel. It makes it easier to hold on to the pinhole. They came from Pinhole Resource, an excellent source of teeny tiny holes and things that hold them. I spent late into early Friday morning designing and making a mount for the pinhole to go on my Mamiya Super 23.
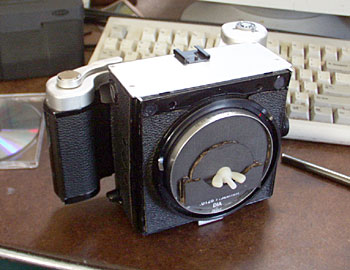
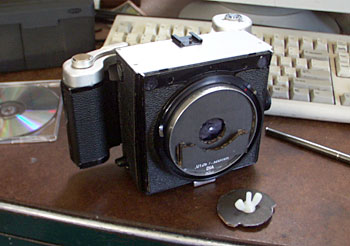
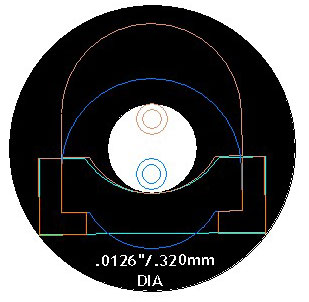
The shiny spot in the center on the "lens" is not the pinhole. That is as close as I wanted to come to the pinhole as I applied the black laquer (via a Sharpie pen). The pinhole is much smaller. It's .0126" dia. I designed the pieces on TurboCad, printed them out on paper and glued the paper, with Barge cement, on cardboard. Then cut out the pieces and glued them together with Barge cement and glued the whole thing in the metal mounting ring from an old lens, with rubber cement.

I'm running a test roll through the camera. This size pinhole, with the optimum focal length, uses an f/stop of f/204. Do you photographers out there know the f/stop progression beyond f/22? In trying to figure it out I ran across this great page explaining everything you wanted to know about f/stops, but were afraid to ask: A Tedious Explanation of the f/stop. It didn't tell me what I wanted to know, but I figured out the ratio between the f/stops and then figured out the f/stops beyond f/90 (which is as far as my Luna Pro light meter goes). After all that work I looked at my Black Cat Exposure Guide, and there they were. So, to answer the burning question that photographers lay awake nights pondering — What comes after f/22? — here is the sequence: f/22, f/32, f/45, f/64, f/90, f/128, f/179, f/256, f/358, f/512, f/717, and, last and least, f/1024.
The end result of this is that I'm shooting 120 Fuji Reala at ISO 3 and f/64 (instead of ISO 50 at f/204), so that I can use my light meter. Reala is rated at ISO 100 but I figure a little extra light won't hurt at those long exposures. Bright and sunny comes out to 4 seconds. I will share any good pinhole photographs that might result from all of this effort.
LP ripping
My cartridge alignment tool arrived yesterday. The old cartridge was exhibiting a 60 cycle hum when it touched down on the record, so I decided to install a new cartridge. In trying to adjust the new cartridge, I ended up removing the tone arm from the pivot which I probably shouldn't have done. There are now two teeny, teeny ball bearings I'm going to have to hold in place somehow in order to reassemble it. I think I know how I'll do that, but the upshot is that I can now see that there is a broken wire coming out of the tone arm and I bet it's a ground for the cartridge, which would explain the 60 cycle hum. I will be doing further disassembly today and hopefully I will find where the other end of the broken wire goes. And more hopefully, I can get it all back together and begin ripping all my LPs. The prognosis is good.
Panoramics
This is another project I have been wanting to do for years. For reasons, explained below, it's been on hold, too. However, a link from Joerg, Ultra-High Resolution Digital Mosaics, has given me a conceptual jump-start. I've been playing with Pana-Vue's Image Assembler for stitching images, with mixed results. The Ultra-High Resolution Digital Mosaics tutorial, and some of the articles it linked to, made me realize the importance of manually adjusting the control points. The software automatically creates points in the overlap areas between images being stiched together. It uses those points to stitch the images together. If they are off, the resulting stitched image will be off. I've been using Image Assembler to stitch multiple scans of LP album covers.
 
 
It's been a little dissapointing because, no matter how hard I try to line things up, anomolies happen.

This morning, I figured out how to manually adjust the control points.

Perfection.

How a piece of software that costs under $70 can do that is totally amazing. I will be working on a series of panos around Whidbey Island.
monitor
My monitor is what has been holding me back on my photography. My current monitor is too dim to calibrate. Tomorrow my new 19" Viewsonic CRT, with flat glass, arrives. Once it is calibrated, I will be moving forward, not only with the pinhole and pano photographs, but also scanning and printing all my old negatives. Many pictures to come. |
